

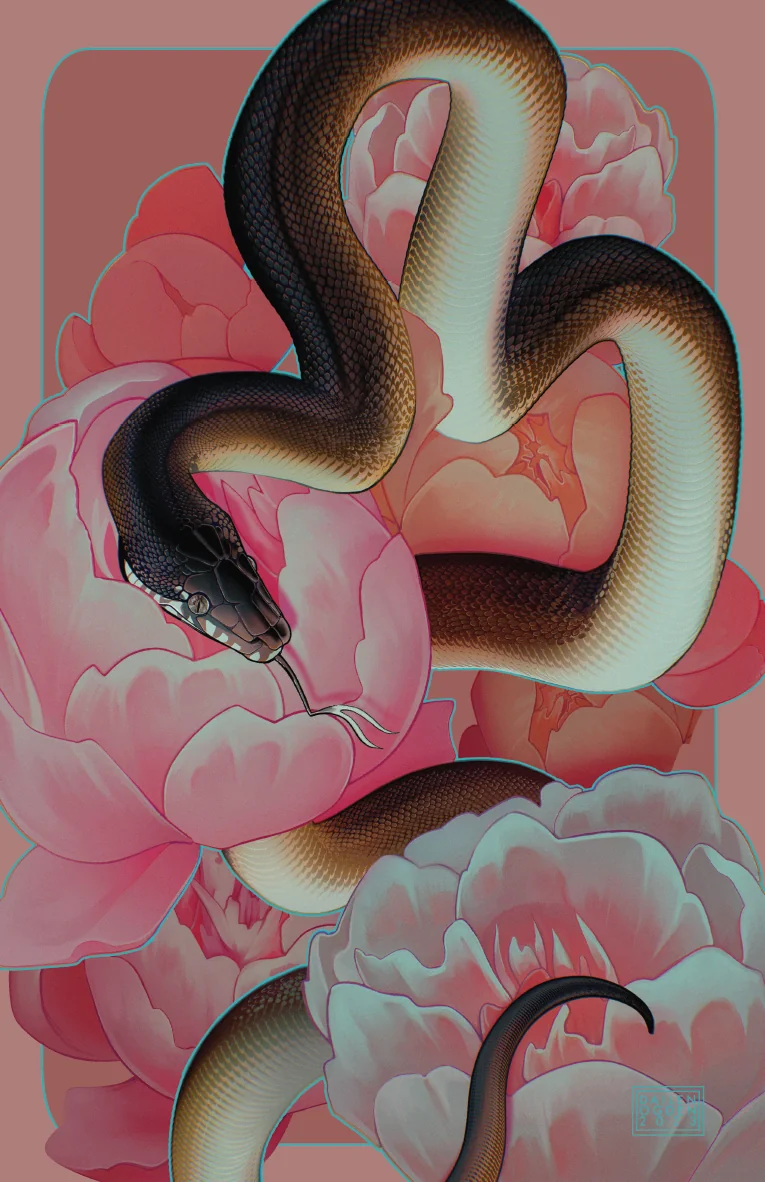
About Holographic Substrate with White Ink Masking
"Iridophore" demonstrates an elegant technique for combining holographic board with selective white ink masking to create a stunning iridescent effect. Named after the pigment cells in reptiles and fish that produce iridescent colors, this print technique uses a gradient-masked white ink layer to selectively reveal or block the holographic substrate beneath the CMYK artwork.
The Hazen HoloJet board provides a rainbow holographic base that shifts colors as the viewing angle changes. By strategically masking areas with white ink, we can control where the holographic effect shows through, creating depth and dimension in the final print.
Hazen HoloJet 16pt C1S Board
Pre-laminated holographic substrate with rainbow effect that shifts colors based on viewing angle. The C1S (coated one side) finish provides an excellent printing surface.
White Ink Mask
Gradient-masked white ink selectively blocks the holographic effect. Areas with white ink appear solid under CMYK, while transparent areas reveal the rainbow substrate.
CMYK Process Print
Full-color digital print applied over the white ink layer. The combination of opaque and transparent areas creates the unique iridophore effect throughout the artwork.
UV Gloss Coating
Protective glossy finish that enhances color vibrancy and adds durability while allowing the holographic effect to shine through.
Creating the White Ink Mask with Photoshop Gradient Masking
The key to achieving the iridophore effect lies in creating a detailed white ink mask that uses gradients to smoothly transition between opaque and transparent areas. This tutorial explains the technique used to create the gradient-masked snake scales in this piece.
Why Use Gradient Masking?
Traditional white ink masks are binary: either fully opaque (100% white) or fully transparent (0% white). Gradient masking introduces smooth transitions that create a more natural, organic effect. On holographic substrate, this means the rainbow effect gradually fades in and out rather than appearing with hard edges.
Step-by-Step Process
- Isolate the subject: Create a precise selection of the areas you want to affect (in this case, the snake's body). Use the Pen Tool or Select Subject for clean edges.
- Create a gradient map: Apply a Gradient Map adjustment layer to your selection. Map the luminosity values of your artwork to white (opaque) and black (transparent).
- Refine the mask: Use Levels or Curves to adjust the gradient transition. Pull midtones toward white for more opacity, or toward black for more holographic reveal.
- Add detail with brushwork: Paint directly on the mask layer to enhance specific areas. Use soft brushes for smooth gradients and hard brushes for defined edges.
- Export as a separate layer: Flatten your white ink mask to a single layer and export as a separate file. This becomes your white ink separation for print.
Technical Considerations
When preparing files for HP Indigo printing on holographic substrate, remember that white ink is printed first, then CMYK on top. Areas without white ink will have the CMYK sitting directly on the holographic surface, which can affect color density and vibrancy. Test prints are recommended to dial in the exact gradient values for your specific artwork.